Compilation of already published Articles/Ideas/Problems-Solutions which I faced or came across over the period of time. Largely a place for me to document it as note-to-self. Nothing serious. :)
Thursday, July 19, 2012
What Prospective Employers Hope To See In Your Facebook Account: Creativity, Well-Roundedness, & 'Chastity'
Graphic from Reppler, based on a survey of 300 hiring types
We all know that employers Facebook stalk us before hiring us (or before deciding not to hire us). In an oft-cited survey [pdf] released by Microsoft Research in 2010, 70% of recruiters said they’d rejected applicants based on info they found online. (Kids, that’s why we don’t take photos of ourselves partying in Vegas with strippers, tigers, and illicit drugs.)
Reppler, a start-up that offers a tool for scrubbing your social networking accounts of job-damaging material, recently commissioned a new survey of 300 hiring types to see how they’re using Facebook, Twitter, LinkedIn, Craigslist, Tumblr, MySpace, et. al. to screen candidates: 91% of them are doing social networking screens of job applicants. (The other 9% asked if they could use a rotary phone to call their nephews and ask, “What’s a face book?”) At what point do these professional Facebook stalkers turn to the Internetz for a background check? Almost half of them started Googling right after getting an application. The rest of them waited until the hiring process was further along.
Again, 69% of those surveyed say they had at some point rejected a candidate based on what they found there. The most frequent sin committed by the erstwhile job seekers was not drinking (reason for the rejection 9% of the time) or drugs (10%) or having a mutual Facebook friend that the employer thinks is a total skeezeball (0%), but getting caught for lying about their qualifications (13%). Honesty is the best policy, job hunters, especially when there are so many places on the Internet for fact-checking your resumé.
Things to avoid if you're job seeking
Before you go ahead and delete or deactivate your Facebook account, note that Reppler also asked the job granters the converse: how often social networking profiles contributed to a candidate getting hired. Heartening news: That turned out to be the case for 68% of them. What’s the good stuff that will help you score a job? Here’s a nice graphic, courtesy of Reppler:
It's not all bad
It boils down to demonstrated creativity, well-roundedness, and the ability not to tell lies about their educational and professional qualifications. Surprisingly, no one said “Because they looked really hot in their profile photos.”
One of those surveyed did fill in his (or her) own reason: “Because they were Chaste.” “Chastity,” eh? I didn’t realize that nunneries had H.R. recruiters.
Thanks to services like Social Intelligence, the likelihood that employers are going to turn to the Internet as a reference is only going to increase. And expecting them not to is ridunkulous. You probably give a truer sense of yourself and what you’d be like to work with on your Facebook wall than you do in a cover letter. So just as you would censor certain stories about your weekend at the office on Monday morning, make sure to set your privacy settings online such that you broadcast the good stuff publicly and keep the ‘unchaste’ stuff out of employers’ view.
Job-searching is hard enough under any circumstances, but how do you conduct an effective job search when you’re employed? If you can’t devote time to your search during the work day, how do you make time for interviews? Can you do a phone interview from your office?
Here are eight tips for searching for a new job when you’re already employed:
1. Don’t job search on your employer’s time, and especially not from your work computer. You may think no one will find out, but some companies do look at employees’ web histories, and having yours full of job listings isn’t a good idea.
2. Don’t use your employer’s resources, like their postage, printer, or copy machine. The one time you print off a job description will inevitably be the time you accidentally send your print job to your boss’s printer or when your boss’s boss finds your resume in the hallway printer. It’s not worth the risk.
(Side note: I once had a candidate FedEx me his resume, using his employer’s account. I could see right there on the shipping slip that he’d billed the cost to his employer. This type of thing is an automatic rejection, because how you treat your current employer can be a good indication of how you’ll treat your next one.)
3. Similarly, don’t use your work email address for correspondence related to your job search. This may sound obvious, but I regularly receive resumes from candidates sent from their work accounts. Not only is this an improper use of your current employer’s resources, but it will look really, really bad to the employer you want to work for.
4. Don’t post your resume on online job boards. This isn’t a terribly effective job-search strategy in most cases anyway, and it has the added risk that someone from your current company will see it.
5. Try to conduct phone interviews from outside your office—ideally from home or somewhere else private. If that’s not an option, consider taking the call from your cell phone in your parked car. Use your office only if you’re absolutely sure you won’t be interrupted.
6. Scheduling in-person interviews can be especially tricky when you already have a job. You can try asking the interviewer to schedule the meeting for first thing in the morning or late in the day, or during lunch time (although be aware that a good interview will often take more time than a typical lunch hour). But you might need to take a personal day or half-day because you have “an appointment,” “an out-of-town visitor,” “some family business,” or so forth.
7. If your workplace is business casual and you show up in a suit because you have an interview later that day, be prepared for the (maybe half-joking) question, “Got an interview?” It might be simpler to bring a change of clothes with you and change outfits somewhere before you arrive to the interview.
8. It’s fine to tell prospective employers that you don’t want your current employer contacted as a reference, since your boss doesn’t know that you’re looking. This is normal and employers will understand why you’re asking it. However, in the rare instance that an employer insists on talking with your current manager, you can explain you’ll be glad to allow it once you have a firm offer (which can be contingent on that reference).
Alison Green writes the popular Ask a Manager blog where she dispenses advice on career, job search, and management issues. She's also the author of Managing to Change the World: The Nonprofit Leader's Guide to Getting Results and former chief of staff of a successful nonprofit organization, where she oversaw day-to-day staff management, hiring, firing, and employee development. She now teaches other managers how to manage for results.
What if your boss finds out you’re looking for a new job?
The general advice, if you are searching for new sales jobs while employed, is to keep your search hidden from your current employer. But, what if your boss does find out? What should you do? Lorena Tonarelliasks, should you deny your intention to leave or tell the truth?
“The truth is always the best policy,” says company director, Derek McCulloch, of ION Recruitment, Glasgow.
“My advice is to be honest and up front on the reasons why you are looking for another job, without being personal about individuals in the company.”
“Being caught can sometimes be a wake-up call for your employer to sort things out. Any reputable employer would rather keep an asset to the business than train another individual. Perhaps the job you are in can be changed to suit you. Or there may be a situation that your boss wasn’t aware of, which is brought to light by you being caught.”
Maybe it could be a good thing
In fact, being discovered may not always be a bad thing, says McCulloch. In some cases, it can even be a “turning point for the better,” if effectively and sensitively managed by both parties.
“It is not gross misconduct to simply look for another job. And the jobseeker still has employment rights. So, as much as your employer will be upset, they’ll just have to realise that something is wrong and fix it before it’s too late,” says McCulloch.
“If they don’t even try, and there really is no chance of any of the issues you have being resolved, you at least know that leaving is the right choice.” Carry on with your search for a job elsewhere, but use your common sense; you don’t want to further compromise your relationship with your boss, in turn contributing to a tense atmosphere in your workplace.
In this regard, McCulloch recommends following these simple tips:
Don’t use your company’s email to apply for roles. Surveys suggest that up to a quarter of employers have a system in place to regularly monitor their employees’ emails. Don’t use your company’s internet for searching roles, either. Wait until you get home.
Don’t ask to take half days off regularly, and don’t call in sick on days you are attending interviews. McCulloch says: “If a jobseeker is caught taking time off for interviews through false reasons, like pretending they are ill, the situation can end up in disciplinary actions by the employer. So, try and have interviews out of working hours whenever possible.”
Remember that, often, employers find out about their staff looking for new jobs from other employees. So don’t go telling colleagues how unhappy you are about your current work position.
Don’t put your employer’s reference details in your CV.
Tell your boss that you intend to leave only when you receive a formal written offer and when a start date has been arranged.
If your offer for a new job is subject to references, don’t hand in your notice until these have been satisfactorily gathered.
The bottom line: if you are job hunting while employed it’s best to be discreet. However, you should also be prepared for the possibility of your boss finding out. This will help you avoid doing, or saying, things that may negatively affect your position at work, and to remain focused on what matters to you most – the search for a more rewarding and fulfilling career.
The conversation started innocently enough. Me and my buddies from work were driving home from lunch and talking about the local job market, and how it looked like companies were starting to hire once again. A friend who was sitting in the backseat with me mentioned that a previous employer had reached out to him to see if he was interested in returning. He said that he wasn’t interested in going back, but told the rest of us that the job had decent pay, and he threw out a number.
The number he threw out was a good ten grand more than I was currently making, so my jaw dropped a little bit upon hearing this. I wasn’t especially interested in leaving my job to go to this company, as they were retail-driven and had a reputation for regular layoffs, but the realization that folks were getting paid that much to do a job very similar to mine was startling. I exclaimed, “Wow, that is a huge number! That is a lot more than I am making.”
As soon as I said this, I couldn’t help but notice that my two friends in the front seat cast a quick look to one another. They didn’t say a word, but I knew right away what that look meant. Every company in the world strongly discourages their employees from discussing salary. Some companies even mention in their employee handbook that this is grounds for termination. It is easy to see why companies take this stance, as it is only going to lead to somebody getting upset if everyone knows how much everyone else is making.
I have the kind of friendship with my co-workers where we are free to call each other out at any time. When I saw their silent glance, I immediately spoke up. ”Uh.. guys, I saw that look. I assume that means that this number is not as shocking to you?” They again looked at each other, apparently trying to decide exactly what they wanted to reveal, so as to minimize the damage. After a few seconds, one of them just said “Let’s just say that.. you should probably take a look at glassdoor.com. Wanting to avoid further awkwardness, we agreed to end the conversation there.
I hadn’t heard of the site before, but I quickly learned that glassdoor is one little jewel of a site. If you list your employer and job title, they will give you the min, max, and average salaries for that position. If you work for a large employer like me, you will be able to quickly determine how you compare to your peers. After the earlier conversation, I wasn’t surprised to learn that I was on the bottom of the range for my job title. The average amount that my company was paying folks to do the same job as me was ten to fifteen thousand more than what I was making!
My first reaction to this news was shock. This was followed by anger, frustration, and a strong desire to quit. I had been a great employee for this company and had received many accolades for my hard work. While my teammates were all good employees and fairly hard workers, I was confident that the work that I was doing was just as good (if not better). I had been perfectly happy with my salary before that day, but now I was pissed! No wonder companies try to keep this type of information secret At this point, there was no going back.
I didn’t want to leave my job, but it isn’t in my personality to just sit around and be angry about something like this. That being the case, I immediately went to work. I started building a detailed case of why I deserved to be paid like I was one of the top performers on the team. I carefully outlined how my work compared with my peers, including information like:
The amount of projects that I ran, compared with my teammates.
The critical nature of the projects that I was assigned to.
The fact that other folks on my team, and on other teams, always come to me for assistance when there are issues.
The fact that I am the Subject Matter Expert on more technologies than anyone else on the team.
After putting together my list and supporting details, I scheduled a meeting with my manager to discuss it. I didn’t want the content of the meeting to completely catch him off guard, so I named the meeting “Jefferson’s Career Path.” My boss ended up rescheduling the meeting into a lunch conversation, which made me nervous, but ended up well. He carefully listened to my points and agreed with everything that I said. In our meeting, of course, I didn’t mention the conversation with my co-workers in my car, but instead pointed to glassdoor.com as to what clued me in. We concluded the meeting with my boss stating that he would do all that he could during the upcoming calibrations to get my salary adjusted to an appropriate level.
If you are curious to find out if you are being underpaid by your current employer, I encourage you to look into it and follow a similar path. It would be incredibly tacky to start a conversation of this kind with your co-workers, but nothing is stopping you from looking at the web resources that are freely available. If you *do* find out that your co-workers are making more than you, then don’t be afraid to build a case and to ask for the situation to be corrected. You deserve it!
Wednesday, July 18, 2012
Hello World, JavaFX Style
The best way to teach you what it is like to create and build a JavaFX application is with a “Hello World” application. An added benefit of this tutorial is that enables you to test that your JavaFX technology is properly installed.
The tool used in this tutorial is NetBeans IDE 7.1. Before you begin, ensure that the version of NetBeans IDE that you are using supports JavaFX 2. See the System Requirements for details.
Construct the Application
From the File menu, choose New Project.
In the JavaFX application category, choose JavaFX Application. Click Next.
Name the project HelloWorld and click Finish.
NetBeans opens the HelloWorld.java file and populates it with the code for a basic Hello World application, as shown in Example 1-1.
Here are the important things to know about the basic structure of a JavaFX application:
A JavaFX application defines the user interface container by means of a stage and a scene. The JavaFX Stage class is the top-level JavaFX container. The JavaFX Scene class is the container for all content. Example 1-1 creates the stage and scene and makes the scene visible in a given pixel size.
In JavaFX, the content of the scene is represented as a hierarchical scene graph of nodes. In this example, the root node is a StackPane object, which is a resizable layout node. This means that the root node's size tracks the scene's size and changes when the stage is resized by a user.
The root node contains one child node, a button control with text, plus an event handler to print a message when the button is pressed.
Figure 1-1 shows the scene graph for the Hello World application.
Run the application, click the Say Hello World button, and verify that the text "Hello World!" is printed to the NetBeans output window. Figure 1-2 shows the Hello World application, JavaFX style.
This concludes the basic Hello World tutorial, but continue reading for more lessons on developing JavaFX applications:
Creating a Form in JavaFX teaches the basics of screen layout, how to add controls to a layout, and how to create input events.
Fancy Forms with JavaFX CSS provides simple style tricks for enhancing your application, including adding a background image and styling buttons and text.
Using FXML to Create a User Interface shows an alternate method for creating the login user interface. FXML is an XML-based language that provides the structure for building a user interface separate from the application logic of your code.
The JavaFX platform is the evolution of the Java client platform designed to enable application developers to easily create and deploy rich internet applications (RIAs) that behave consistently across multiple platforms. Built on Java technology, the JavaFX platform provides a rich set of graphics and media API with high-performance hardware-accelerated graphics and media engines that simplify development of data-driven enterprise client applications.
Investing in the JavaFX platform provides the following advantages to Java developers and companies that are part of the Java ecosystem:
Because the JavaFX platform is written in Java, Java developers can leverage their existing skills and tools to develop JavaFX applications.
Because Java is widely used, it is easy to find experienced Java developers who can quickly become productive building JavaFX applications.
By using a homogenous set of Java technologies for both the server and the client platforms, the JavaFX platform reduces the risk of investment by reducing the complexity of the business solutions.
Development costs are also reduced because of the aforementioned advantages.
The JavaFX platform provides developers with a development framework and runtime environment to create enterprise and business applications that run across multiple platforms that support Java.
At the JavaOne 2007 conference, Sun Microsystems introduced the JavaFX platform to help content developers and application developers to create content-rich applications for mobile devices, desktops, televisions, and other consumer devices. The initial offering consisted of the JavaFX Mobile platform and the JavaFX Script language. Multiple public releases were delivered after the initial announcement; the 1.3 version was released on April 22, 2010.
After Oracle's acquisition of Sun Microsystems, Oracle announced during the JavaOne 2010 conference that support for the JavaFX Script language would be discontinued. However, it was also announced that the JavaFX Script APIs will be ported to Java and would be released as part of the JavaFX 2 product. This announcement meant that the JavaFX capabilities will become available to all Java developers, without the need for them to learn a new scripting language. With this announcement, Oracle has committed to making JavaFX the premier environment for rich client applications.
What's New in JavaFX 2?
The main focus areas for the JavaFX 2 release include the following features, many of which are also described in the JavaFX Architecture and Framework document:
Java APIs for JavaFX that provide all the familiar language features (such as generics, annotations, and multithreading) that Java developers are accustomed to using. The APIs are designed to be friendly to alternative JVM languages, such as JRuby and Scala. Because the JavaFX capabilities are available through Java APIs, you can continue to use your favorite Java developer tools (such as IDEs, code refactoring, debuggers, and profilers) to develop JavaFX applications.
A new graphics engine to handle modern graphics processing units (GPUs). The basis of this new engine is a hardware accelerated graphics pipeline, called Prism, that is coupled with a new windowing toolkit, called Glass. This graphics engine provides the foundation for current and future advancements for making rich graphics simple, smooth, and fast.
FXML, a new declarative markup language that is XML-based and is used for defining the user interface in a JavaFX application. It is not a compiled language and, hence, does not require you to recompile the code every time you make a change to the layout.
A new media engine that supports playback of the web multimedia content. It provides a stable, low latency media framework that is based on the GStreamer multimedia framework.
A web component that gives the capability of embedding web pages within a JavaFX application using the WebKit HTML rendering technology. Hardware accelerated rendering is made available using Prism.
A refreshed browser plug-In for JavaFX 2 that allows the loading of JavaFX applets based on Prism.
A wide variety of built-in UI controls, which include Charts, Tables, Menus, and Panes. Additionally, an API is provided to allow third parties to contribute UI controls that the user community can use.
Sample applications that showcase the different features of the JavaFX 2 technology, along with a large number of code samples and snippets.
An updated doclet used with the Javadoc tool to generate JavaFX API documentation in HTML format. Detailed information on how to use this updated doclet can be found inUsing a Doclet with JavaFX.
What Can I Build with JavaFX?
Table 1 shows thumbnail images of some of the sample JavaFX applications that are included with the JavaFX 2 release. Click each thumbnail to view a larger image of the application.
To run these and additional sample applications, go tohttp://www.oracle.com/technetwork/java/javafx/downloads/index.html. Download the zip file that contains the JavaFX Samples and extract the files. The javafx-samples-2.1.x\ directory is created and contains the files for the available samples. You can run a sample by double clicking one of its executable files. For example, to run the Ensemble sample application, double-click the Ensemble.jar file. NetBeans projects for the samples are in the javafx-samples-2.1.x\src directory. Refer to the JavaFX Release Documentation page for the appropriate System Requirements document that lists the supported version of NetBeans IDE that you need to run these sample projects.
Table 1 Sample JavaFX Applications
Sample Application
Description
JavaFX Ensemble
Ensemble provides a gallery of applications that demonstrate various JavaFX features, such as animation, charts, and controls. You can view the running sample, read a description, copy the source code, and follow links to the relevant API documentation.
Sales Dashboard (DataApp)
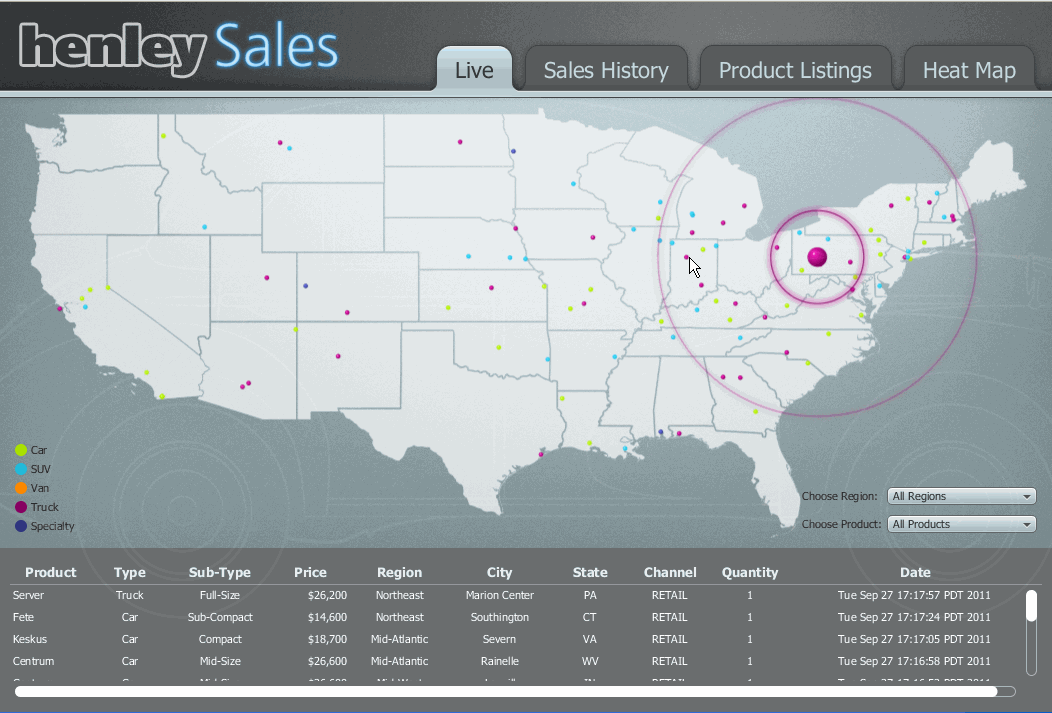
A client-server application for a fictional global automobile company called Henley Automobiles. Automobile sales are simulated on an EJB server using JavaDB, and the data is available via Derby and a RESTful web service. The client demonstrates a variety of data presentations, using a mix of FXML and JavaFX.
SwingInterop Sample
This Swing application shows how Swing and JavaFX can be combined. It uses JavaFX components to implement a chart and a table in one tab, and it shows a simple browser implemented by JavaFX in another tab.
Source code for each sample is in the javafx-samples-2.1.x\src directory. To view the source code, go to the javafx-samples-2.1.x\src\ directory, where is the name of the application in which you are interested. Each of the sample source directories is a NetBeans project.
How Do I Create JavaFX Applications?
Because JavaFX applications are written in the Java language, you can use your favorite editor or any integrated development environment (IDE) that supports the Java language, such as NetBeans, Eclipse, Oracle JDeveloper, or IntelliJ IDEA, to develop JavaFX applications. Use the following steps to get started creating JavaFX applications:
Introduction to JQuery -- a Powerful JavaScript Library
by Julien Dubois
JQuery, a popular open source JavaScript Library, provides many advanced and cross-browser functions that can enhance your web applications. This article starts with the basics and then shows you how to extend JQuery with its plug-in system.
Note: You do not need to have already completed the exercises in the first article to follow this article. Also, you can download the sample application for the first article using a link provided at the end of the first article.
This second article introduces JQuery, an extremely popular, open source JavaScript library. We will start by looking at the current state of the art in JavaScript technology to see why JQuery is used in many impressive applications.
We will then use our case study from the first article in order to create a simple HTML page, which will serve as the basis for a hands-on tutorial for performing the following tasks using JQuery functionality:
Selecting HTML elements with JQuery
Manipulating HTML elements
Adding some animations to the Web page
Using JQuery UI to add a custom theme
Extending JQuery with the numerous available plug-ins
At the end of this article, we will have a user-friendly HTML and JavaScript front end, ready to be used for our application.
Why Use JQuery Instead of Just Basic JavaScript?
JavaScript is a fairly low-level programming language. It does not provide advanced page manipulation and decoration functions, and it provides nothing concerning animations. Moreover, using direct JavaScript can cause issues related to browser incompatibilities. Those issues have made many JavaScript applications difficult to code, resulting in high maintenance costs.
JQuery aims to ease all these problems by providing a lightweight library that adds many advanced and cross-browser functions to the standard language. In addition, there is a very dynamic community that adds more-advanced components based on JQuery.
A modern Web application wouldn't be complete without some AJAX functionality. JQuery provides functions for sending HTTP GET and POST requests, and it can work easily with the JavaScript Object Notation (JSON) format we saw in the first article. This functionality enables us to query the REST back end we coded in the first article.
Installing JQuery
JQuery is a JavaScript library, so installing it is just a matter of importing a script inside a Web page. However, there are a few best practices to be aware of:
JQuery is available through several content delivery networks (CDN). Using those CDNs instead of installing JQuery on your servers should provide significant performance and bandwidth gains.
As with any static content, JQuery files should be served compressed. That's why there are two versions of JQuery available: a minified (or “min”) version, which is small and efficient, and a development version, which is easier to read and debug. For the rest of this article, we will use the min version, which is enough for our needs.
JQuery files should be cached on the client side, so you should use the JQuery version number in the file name.
Let's start with a simple HTML Web page, which will be used for our sample application.
Launch NetBeans and re-open the ArticleEvaluator project from the first article.
Right-click the Web Pages node and select New > Web > HTML.
Name your page article and click Finish.
Replace the content of the newly created file with this HTML code:
Sample article
Sample article
Article text
1
As you can see, this file refers to a CSS file that you need to create:
Right-click the Web Pages node and select New > Web > Cascading Style Sheet.
Name your page style and click Finish.
Here is the content to copy and paste for this file:
To test your HTML page, you can launch GlassFish (as in the first article) and point your browser to http://localhost:8080/ArticleEvaluator/article.html. You can also open this Web page directly from the file system, because it is just a static HTML file.
Selecting Elements with JQuery
The easiest way to get started with JQuery is to select some elements on our sample Web page.
Let's select the author division, which we copied and pasted in the previous section, in order to change this element to display some user information. As you can see from the HTML code and the CSS file, it currently contains the user ID, and it is included in a hidden
element. There are several ways to select this HTML element. Let's start by using its ID:
$("#author");
$ is not a JavaScript-specific keyword. It's a one-letter function that is defined by JQuery. The text that is passed to this function is parsed by JQuery, which then generates the correct series of JavaScript functions to select the requested Document Object Model (DOM) elements. This method of selecting DOM elements is concise and browser-independent, which addresses the two most important problems that arise with JavaScript programming. As a result, JQuery enables quick, simple, and powerful cross-browser selection of DOM nodes in the Web page.
Of course, the ID is not the only way to select elements. You can use the elements' class or some properties of those elements. For example, you can select all the elements with the vote class:
$(".vote");
In order to read the author's ID from our Web page, add the following code just before the closing tag:
This task illustrates a common best practice with JQuery: The $(document).ready() function is launched when the Web page is ready, and it is loaded at the end of the page. From a user point of view, this means the whole page loads normally, and then JQuery is used to enhance the page.
Using the previous code, the author's ID will be read at startup time. You can test this by using the JavaScript alert() function.
Manipulating a Web Page's Elements
After HTML elements have been selected, you will certainly need to manipulate them by changing their CSS class, adding some text, or even replacing them completely. JQuery provides functions for all those tasks.
The use case we are going to implement is to replace the author's ID, which we selected earlier, with this author information: author's first name, author's last name, and a URL. For the moment, this information will be stored statically inside our JavaScript code, but in the third article of this series, we will get this information from the REST back end we coded in the first article.
Here is the author's information we are temporarily hard-coding in the JavaScript code:
function Author(id, firstName, lastName, url) {
  this.id = id;
  this.firstName = firstName;
  this.lastName = lastName;  this.url = url;
  }

var author = new Author("1", "Julien", "Dubois", "http://www.oracle.com");
Because we already read the author's ID and we already know how to select the author's
element, we can replace the text from this element:
JQuery provides numerous other functions to change an HTML element. For example, we can make an element appear or disappear using the show() and hide() functions. An alternative way would be to change the CSS class used by an element; for this, JQuery provides functions to add a class, remove a class, or test whether a class is present.
Now that the author's ID has been replaced by the author information, let's display this information, which is the topic of the next section.
Adding Animations
Displaying an element is nice, but it is a lot more user friendly (and fun!) to add some animations. JQuery provides a rich set of animations that enables a very smooth user experience.
Of course, if you abuse these animations, your Web site will become difficult to use. So you need to find the right balance to have a nice-looking Web site.
For displaying the author information, we do not want something too flashy, because the author information is not the most important part of the page. Let's select a simple slide-down animation:
$("#author-wrapper").slideDown("slow");
Using animations with AJAX is very important from a user perspective:
Animations hide the fact that some requests take time to be processed server-side.
Animations attract the user's attention to what is changing on the Web page. Without an animation, a user might not notice that part of the page changed.
Using a JQuery Theme
JQuery UI is an extension to JQuery that adds widgets and themes on top of JQuery. JQuery UI is hosted at http://jqueryui.com/.
JQuery UI provides higher-level components, such as calendars, dialog boxes, auto-completed fields, and tabs, that all have the same look and feel. The result is similar to what we can do with JavaServer Faces technology, except the components here are fully rendered using JavaScript. Most of the components can work with AJAX. For example, the Autocomplete widget can get its data from local JavaScript code or from a call to a remote URL.
Several themes are provided as examples, but the most impressive part is an online application,http://jqueryui.com/themeroller/, that allows you to dynamically create your own custom theme. This theme can then be downloaded and used inside an application simply by importing the custom JavaScript, CSS, and images that are generated.
Here is an example configuration, in which the JQuery UI theme was unzipped in the jquery folder:
Sample article
We are not using JQuery UI and its widgets system in our sample application. So you should not add this code to your ArticleEvaluator code, because it will not have any effect.
If we were using JQuery UI, the generated theme would have automatically decorated all JQuery UI widgets. Of course, you can still use the theme to explicitly decorate your own elements by directly giving them a specific JQuery UI class.
Extending JQuery with Its Plug-in System
One of the reasons for the success of JQuery is its vibrant community, which provides hundreds of high-quality plug-ins. Our application still needs some very important functionality: the ability to vote for the articles. Hence, we would like to use a rating plug-in that provides us with a graphical view of the vote. At the JQuery Web site, it is easy to find some plug-ins related to our need by using this specialized search engine: http://plugins.jquery.com/
However, for the following reasons, use care when selecting a plug-in: The plug-ins are not supported by JQuery. The plug-ins' authors usually indicate which JQuery version their plug-ins are compatible with, but there can be issues if you use many plug-ins and you want to upgrade JQuery. The licenses can differ; your company probably will want to avoid any GPL-licensed plug-in. There is often more than one plug-in available for a particular need. It is then a matter of selecting the most appropriate one.
For our sample application, let's select the JQuery Star Rating plug-in:
To use this plug-in, you need to import its JavaScript script and CSS file in the sample Web page:
Download the plug-in, using the link above. For this article, we've used version v3.13 of the plug-in.
Unzip the downloaded file to a folder called star-rating inside the web folder of your application. (This web folder is displayed as Web Pages inside NetBeans.)
Add the plug-in's JavaScript and CSS files inside the header section of your Web page:
Sample article
This plug-in works by enhancing existing radio buttons on the Web page. For this functionality, we need to create an HTML form containing those buttons. Copy and paste the following code just before the author-wrapper division element:
Using the plug-in is then just a matter of selecting the radio buttons that have the rating class and invoking the rating() function provided by the plug-in:
$(".rating").rating({
  callback: function(value, link){
    alert("The value selected was '" + value + "'.");
   }
  });
In the previous example, we added a callback function so we know which radio button was clicked.
Of course, this doesn't trigger any process in our application back end; the votes are not saved anywhere. In the third article of this series, we will send this data to our application back end so we have the full system working.
Conclusion
In this article, we demonstrated how to select, manipulate, animate, and extend a simple Web page. We saw that JQuery is very easy to use and we did not worry at all about cross-browser issues, because JQuery provides an abstraction layer that protects us from those problems.
A completed sample application can be downloaded here:
This sample application contains the code from the REST application we coded in the first article plus the article.html page we coded in this article, which is located in the web folder.
In the next article, we will link this Web page to the REST back end in order to have a complete application.
Julien Dubois has been a Java developer and architect for more than 10 years. He is the co-author of a top-selling French book on the Spring Framework, and even worked for SpringSource before the company got bought by VMWare. He now leads his own consulting company, Responcia, which provides http://responcia.net, a French knowledge management solution.


 At this point, there was no going back.