1. Introduction
Maven is a popular build tool available for java developers. One of the benefits of maven is that helps to reduce the duplication of dependent software libraries (jars) required to build an application. The maven suggested approach is to store all the software libraries in a remote store called a repository.
Maven synchronizes with the public repository at
ibiblio.org This repository is slow, unreliable and does not have the latest versions of some libraries(jars) available elsewhere. Libraries private to the organization cannot be uploaded there either. By setting up an internal maven repository, an organization can avail of the benefits of a maven repository and bypass some of the shortcomings of the repository at ibiblio.
This article looks at some of the functionality that a maven repository should provide. Criteria for choosing a maven repository are listed. Steps involved in setting up a maven repository using Artifactory are explained. The process of setting up the repository is same for both Linux and Windows and the minor differences are highlighted in the article. Examples of maven ‘pom’ files which use this repository are shown. The article is illustrated with screenshots to guide the user in setting up a repository. Sample maven and artifactory configuration is shown.
1.1 Background knowledge
It is assumed that the reader is familiar with the following concepts and technologies:
- Maven 2
- JEE web servers deployment process (e.g. deploying web applications to Tomcat)
- XML
1.2 Purpose of maven repository
The purpose of maven repository is to serve as an internal private repository of all software libraries used within an organization. Storing maven artefacts(jars and poms) in a dedicated maven repository is preferable to storing them in version control systems(such as CVS or Subversion) for the following reasons:
- Libraries(jars) are binary files and don’t belong in version control systems which are better at handling text files
- Keeps the version control database small
- Checkouts, updates and other actions on the version control system will be quicker
1.3 Advantages of having an internal private repository:
- Reduced likelihood of version conflicts
- Less manual intervention required for doing a build first time
- A single central reference repository of all dependent software libraries rather than several independent local libraries
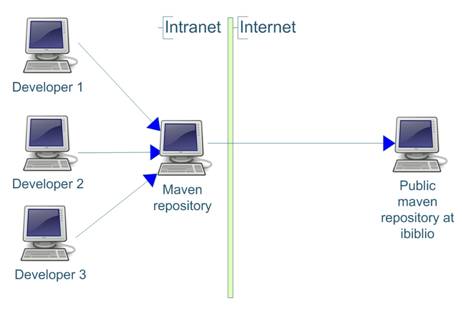
- It is quicker to do a clean build when using an internal repository as maven artifacts are retrieved from a server on the intranet rather than the ibiblio server on the internet
1.4 Types of maven repository
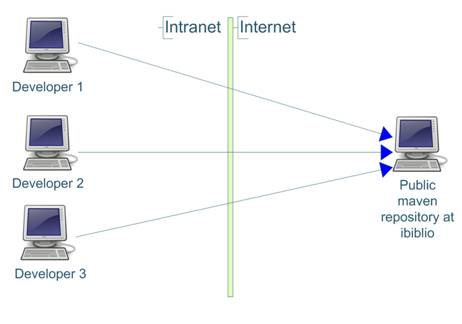
- Local repository – exists on developers machine and is maintained by the developer. It is in sync with the maven repositories defined in the ‘settings.xml’ in their ‘~home/.m2’ folder. If no private remote internal repository is setup and listed in the pom.xml file or settings.xml file, then this local repository on developers machine is synchronized with the public maven repository at ibiblio.org
- Private remote internal repository – This the repository which we will setup. We will change the maven pom.xml or settings.xml to use this repository
- Public remote external repository – This is the public external repository at ibiblio.org. By default, maven synchronizes with this repository.
2. Overview of maven repository
2.1 Development environment without any repository
2.2 Development environment with an organization wide internal remote repository
3. Use cases for maven repository
- Create 2 sub-repositories within the internal repository
- ‘Ibiblio-cache’ for artefacts downloaded from ibiblio.org and available publicly. This would be synchronized with external repository from ibiblio
- internal-maven-repository – for organizations internal artefacts. This is not synchronized with any external repository and contains artefacts which are unique to the orgranization
- Alternatively, another sub-repository can be created for artefacts available publicly but not in ibiblio – e.g. later versions of some artefacts. This would not be synchronised with an external repository. We can call this ‘3rd-party’
- Browse remote repository, preferably using a web browser
- Search for artefacts in the repository
- Download code from version control, change ‘settings.xml’ to point to the internal repository and do a clean build without any manual intervention
- Install new version of an artefact
- Bulk import artefacts into the repository
- Bulk export artefacts from the repository
- Backup the repository manually and setup task to do this automatically
4. Criteria for choosing a maven repository implementation
The ideal maven repository implementation should be:
- Open source and free
- Provide admin tools
- Provide a repository browser – preferably web browser rather than desktop application.
- Deployable in standard web server – e.g Apache or Tomcat
- Ability to create, edit and delete sub repositories
- Bulk import/export facility to move groups of artefacts into and out of the repository
- Access control facility and anonymous read-only access
- Easy to setup and use
- Backup facility
- Issue tracker, forums and other independent sources of information
- Active community/developers so that the produce is enhanced and bugs fixed
5. Comparison of various maven repositories
Some of the popular open source and free maven repositories are:
A comparison is shown below:
| Standard maven repository | Dead simple Maven Proxy (DSMP) | Proximity | Artifactory |
| Admin tools | No | Basic | Yes | Yes |
| Repository browser | Basic | No | Yes | Yes |
| Deployable in standard web server (e.g. Tomcat or Jetty) | Yes, but not configurable | No | Yes | Yes(works in Tomcat and bundled with Jetty) |
| Create, edit and delete sub repositories | Yes | Yes | Yes | Yes |
| Bulk import/export artefacts | No | No | No | Yes |
| Easy to setup and use | Yes | No, build from source | Yes | Yes(Ajax web UI) |
| Backup facility | No | No | No | Yes(using Java quartz API and ‘cron’ expressions) |
| Issue tracker, forums and other sources of information | Jira, IRC | No | Wiki and issues tracker | Jira issue tracker. Good documentation on site |
| | | | |
Following review of all products, Artifactory has all the criteria that we are looking for. Proximity maven repository also seems to have most of the features we are looking for. We will look at implementing the maven repository using Artifactory.
Other points about Artifactory are:
- Meets all our requirements
- Apache 2.0 license
- Runs on JDK 1.6 and Tomcat 6. Artifactory is deployed as a ‘war’ file in Tomcat.
- Uses Derby DB to store artefacts. Data is stored in a published and well known format
- All artefacts can be bulk exported to local repository and then imported into some other repository so it is easy to move artefacts from one implementation to another. It also makes upgrades of maven repository very easy
- Compliant with Java Content Repository standard (JSR-170).
- Uses Lucene as search engine. Repository is indexed and can be re-indexed
- UI done using Ajax
- Easy to customise the UI
- Uses Jira as an issue tracker
6. Setting up the maven repository
6.1 Required software
6.2 Directory structure
Down load and unzip artifactory. The directory structure is shown below:
The folders are:
- Backup – backup of repository. Backup policy can be setup using ‘cron’ expressions. Quartz scheduler is used to run the backup at the specified time. The backup interval is specified in the ‘ARTIFACTORY_INSTALLATION_FOLDER>/etc/artifactory.config.xml’
- Bin – batch files used to run the included jetty web server
- Data – Has derby database files. Everything in this folder can be deleted if you wish to start with a clean repository. In a new installation of artifactory, this folder is empty.
- Etc – Configuration files for artifactory. Has ‘artifactory.config.xml’ and ‘jetty.xml ‘and ‘log4j.,properties’
- Lib – has all the dependent jar files
- Logs – log files
- Webapps – has the ‘war’ file. This can be copied and installed in tomcat.
6.2 Deploy in Tomcat 6
Deploy the ‘war’ file in ‘
_FOLDER>/webapp’ to ‘/webapps’. No tomcat configuration changes are required with jdk1.6 and Tomcat 6. Tomcat 6 should detect the web application and deploy it.
Once the web applications is deployed, the web application needs this information:
- Location of the database to store the artefacts
- Location of the artifactory config xml file
- Location of backup folder
A single configuration is used to specify all 3. We only have to specify the location of the location of the artifactory installation folder during Tomcat startup and artifactory will be able to work out the rest. An alternative to this approach would have been to setup connection to the derby database using jdbc and to configure artifactory in the web application(by including artifactory.config.xml in the web application). However, this approach is simpler.
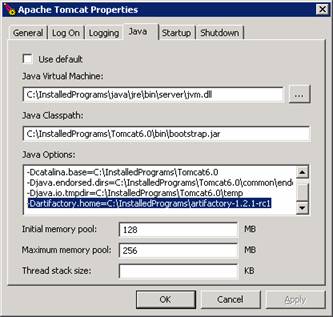
The location of artifactory installation folder can be specified as a environment variable. For Linux, use ‘.bash’ script to export the location of the artifactory installation folder as shown below:
export JAVA_OPTS = -Dartifactory.home=/home/amangat/artifactory-1.2.1-rc1
For Windows, it can be added to Tomcat startup options as shown below:
6.3 Setup the maven repositories
A suggested approach is to create 3 repositories(or sub repositories) in our maven repository. They are:
- Private-internal-repository: This repository contains artifacts which are used only within the organization. These are manually uploaded by the developer. This does not synchronize with remote repository with ibiblio as the artifacts in this repository(or sub-repository) are private to the organization.
- 3rd-party: This contains artifacts which are publicly available but not in ibiblio repository. Example could be latest versions of libraries which are not yet available on ibiblio or jdbc drivers. This repository is not synchronized with ibiblio as ibiblio does not have these jars
- Ibiblio-cache: This repository is synchronized with ibiblio repository and is a cache of the artifacts from ibiblio.
This is configured in the
_FOLDER>/etc/artifactory.config.xml’. The configuration to setup these 3 repositories is shown below:
          private-internal-repository
          Private internal repository
          true
          true


          3rd-party
          3rd party jars added manually
          true
          false


          ibiblio
          true
          false
          org/artifactory/**,org/jfrog/**
          http://repo1.maven.org/maven2
The artifactory home page is shown below:
Sign in using username ‘admin’ and password ‘password’. Click on the Browse repository link and you should be able to view the contents of the repository.
7. Configuring maven to use the new repository
7.1 Configure maven using settings.xml
Maven uses the settings.xml file located at ‘~/.m2/settings.xml’ to get the location of maven repository. If no repository is specified, maven uses the default repository which is at
ibiblio.org. The settings.xml file has to be changed to use the new repository. The settings are shown below:
            dev

                  C:/InstalledPrograms/apache-tomcat-5.5.20


                        central
                        http://localhost:8080/artifactory/repo

                              false


                        snapshots
                        http://localhost:8080/artifactory/repo

                              false


                        central
                        http://localhost:8080/artifactory/repo

                              false


                        snapshots
                        http://localhost:8080/artifactory/repo

                              false
7.2 Configure maven using project ‘pom.xml’
The repository settings can also be done in the project pom.xml. A simple ‘pom.xml’ is shown below:
4.0.0
test
test
jar
1.0-SNAPSHOT
test
http://maven.apache.org


                              central
                      http://localhost:8080/artifactory/repo

                              false


                      snapshots
                      http://localhost:8080/artifactory/repo

                              false


                      central
                      http://localhost:8080/artifactory/repo

                              false


                      snapshots
                      http://localhost:8080/artifactory/repo

                              false


     junit
     junit
     3.8.1
     test
7.3 Building using the new maven repository
When building the maven project, all the repositories should be downloaded using the new repository. The console will show the server maven uses as shown below:
Login to the new repository using your web browser and you will see that artifactory has downloaded and cached the artifacts from ibiblio.
7.4 Installing artefacts to the repository
Artifacts can be installed using the web UI or using maven command line. Installation using the web UI is simple and faster and does not require any configuration changes. Installation using the command line requires configuration changes in settings.xml and the it can be used in other scripts.
7.4.1 Installing artifacts using the web UI
The steps involved are shown below:
- Upload the artifact to deploy (‘jar’ file or ‘pom’ file)
- Artifactory will create the pom file if you are uploading a jar file. You can also specify which repository to upload to.
- Once uploaded, the artifact appears in the repository along with the ‘pom’ file created by artifactory.
7.4.1 Installing artifacts from maven command line
When using ‘mvn clean install’ command, maven only packages and installs the artifact to the local repository. To install it to the AHP internal repository, we have to add an additional configuration section in the settings.xml. The steps involved are shown below:
                  organisation-internal
                  admin
                  password
To install an artefact to internal maven repository, the command is:
mvn deploy:deploy-file -DrepositoryId=organisation-internal -Durl=http://localhost:8080/artifactory/private-internal-repository
-DgroupId=test -DartifactId=test -Dversion=1.1 -Dpackaging=jar -Dfile=target/test-1.1.jar
The repository id should match the server id defined in the settings.xml. The url should include the name of the repository the artefact is to be installed in.
The new artifact appears in the repository and artifactory has created the ‘pom’ file for us automatically.
8. Other features of Artifactory
8.1 Backup the repository
Backup policy is specified in the
_FOLDER>/etc/artifactory.config.xml. Backup schedule is specified using ‘cron’ expression. The backup configuration element is highlighted below:
    0 0 /12 * * ?


          private-internal-repository
          Private internal repository
          true
          true


          3rd-party
          3rd party jars added manually
          true
          false


          ibiblio
          true
          false
          org/artifactory/**,org/jfrog/**
          http://repo1.maven.org/maven2
Backups are stored in ‘
_FOLDER>/backups’. The backups are in the same format as the local repository on developers machine. This makes it very easy to migrate the repository contents to another implementation of maven repository.
- Delete artifacts using the web UI
- Search for artifacts using the web UI
- Bulk import/export all artifacts in repository
- The included jetty web server can be used if tomcat is not required
9. Conclusion
An internal private maven repository speeds up the build process and makes it easier to do clean builds. It also helps to avoid conflicts due to different versions of libraries.
Amongst the 4 common maven repositories available, Artifactory seems to be the better product.
Artifactory makes it easy to setup a maven repository. It provides all the features which a good maven repository should implement. The organization will not be locked into this tool as it is easy to migrate the repository contents to another implementation. A web UI makes the repository easy to use even for people who don’t know how the repository works.
Biography
Avneet Mangat has 5 years experience in Java/J2EE, and is currently working as Lead developer at Active Health Partners (
www.ahp.co.uk). He has a Bachelor’s degree in Software Engineering, and is a Sun Certified Java programmer, Adobe certified Flash Designer and Prince2 certified (foundation). He is the lead developer of open source tool DBBrowser, please see
http://databasebrowser.sourceforge.net/ . His outside interests include photography and traveling, and he can be contacted at
avneet.mangat@ahp.co.uk or
avneet.mangat@gmail.com.
 Built on top of the Java Content Repository (JCR), Artifactory offers higher concurrency and unmatched data integrity. When run on top of MySQL Artifactory can support an amazingly high volume of concurrent downloads and deployments. Underlying storage supports Artifactory's OpenMetadata(TM) technology, allowing every repository item to be attached to any kind of XML metadata and backup ready. The Artifactory UI uses the excellent Wicket framework.
  Artifactory started in 2006 as a pioneering Open Source project trying to solve real problems with Maven integration within a variety of enterprise settings. Artifactory uses the understanding and expertise gained from dealing with real-world needs, blazing the trail for others to follow.