Annotations in JUnit
Annotations are like meta-tags that you can add to you code and apply them to methods or in class. These annotation in JUnit gives us information about test methods , which methods are going to run before & after test methods, which methods run before & after all the methods, which methods or class will be ignore during execution, which methods are suspected to throw exception etc.
Annotation are added in JUnit 4 version & you can found it in all the releases after this version. Annotations reduces coding & extra burden from tester. The annotations in JUnit are predefined and need not to define, you can implement it directly. Also you can have your own defined annotations in class. But for testing , annotations are predefined in JUnit.
Given below list of annotations and their meaning in JUnit :
| Annotation | Description |
| @Test | The Test annotation tells JUnit that the public void method to which it is attached can be run as a test case. |
| @Before | Several tests need similar objects created before they can run. Annotating a public void method with @Before causes that method to be run before each Test method. |
| @After | If you allocate external resources in a Before method you need to release them after the test runs. Annotating a public void method with @After causes that method to be run after the Test method. |
| @BeforeClass | Annotating a public static void method with @BeforeClass causes it to be run once before any of the test methods in the class. This can be used to perform computationally expensive setup (like logging into a database). |
@AfterClass
|
Will perform the method after all tests have finished. This can be used to perform clean-up activities for example be used to disconnect to a database
|
@Ignore
|
Sometimes you want to temporarily disable a test or a group of tests. Methods annotated with Test that are also annotated with @Ignore will not be executed as tests. Also, you can annotate a class containing test methods with @Ignore and none of the containing tests will be executed.
|
Example
In the given below example, we will test a method Add() using another test class. You will notice that @ Test annotation is applied to testAdd() method which is used for testing Add() method of Addition class.
Given below the code of both the classes & output of the test :
Addition.java
package devmanuals.junit;
public class Addition {
int c;
int Add(int a, int b) {
c = a + b;
return c;
}
}
AdditionTest.java(Test class to test Addition class)
package devmanuals.junit;
import static org.junit.Assert.*;
import org.junit.Test;
public class AdditionTest {
        Addition s = new Addition();
        @Test
        public void testAdd() {
                int a = 3, b = 6;
                int expectedOutput = (a + b);
                assertEquals(expectedOutput, s.Add(a, b));
        }
}
Output
After running Test Class following output will appear :
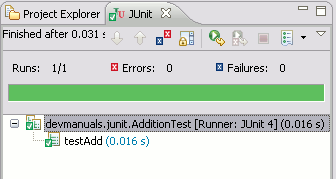
Download Source Code
Annotations have made some of the programming stuffs easier because they do a lot of things in the background, which any programmer would otherwise needed to have coded by themselves. JUnit uses a bunch of annotations and represents various separate tasks they do behind the scene. Here are some of the most widely used annotations from Java based Unit Testing Framework – The JUnit. If you would like to see a comprehensive example of JUnit with all these annotations in action, see myprevious article on JUnit Test Case
- @Test
- Denotes a test method. Can be used with expected to assert expected results on the object under test.
- @Before
- Run before each test method is run i.e. do a setup
- @After
- Run after each test method is run i.e. do a teardown
- @BeforeClass
- Run before all the tests in a class (Runs once for all of the tests)
- @AfterClass
- Run after all the tests in a class (Runs once for all of the tests)
- @Parameters
- Allows you to run the same test with different data by defining the data parameters. @Parameters have to return List[], and the parameter will pass into class constructor as argument.
- @RunWith
- Exclusively tells the class that the Junit Test Case uses Parameterized runner
- @Ignore
- This allows to skip a test. You might want to skip a test if you are still working on it or you are not convinced it’s a valid test case or maybe ignore cases which are long running.
| Annotation | Description |
|---|---|
@Test
public void method() | The @Test annotation identifies a method as a test method. |
| @Test (expected = Exception.class) | Fails, if the method does not throw the named exception. |
| @Test(timeout=100) | Fails, if the method takes longer than 100 milliseconds. |
| @Before public void method() | This method is executed before each test. It is used to can prepare the test environment (e.g. read input data, initialize the class). |
| @After public void method() | This method is executed after each test. It is used to cleanup the test environment (e.g. delete temporary data, restore defaults). It can also save memory by cleaning up expensive memory structures. |
| @BeforeClass public static void method() | This method is executed once, before the start of all tests. It is used to perform time intensive activities, for example to connect to a database. Methods annotated with this annotation need to be defined asstatic to work with JUnit. |
| @AfterClass public static void method() | This method is executed once, after all tests have been finished. It is used to perform clean-up activities, for example to disconnect from a database. Methods annotated with this annotation need to be defined as static to work with JUnit. |
| @Ignore | Ignores the test method. This is useful when the underlying code has been changed and the test case has not yet been adapted. Or if the execution time of this test is too long to be included. |
No comments:
Post a Comment